Showing posts with label Visual Basic. Show all posts

ADO DATAGRID

Connected to a Database

Begin by launching Visual Studio and creating a new Windows Application project called "VBdatabase". Once the new project has been created the first task is to connect to the Northwind database. Click on the View menu and select Server Explorer. The Server Explorer panel will appear on the left hand side of the main Visual Studio area:
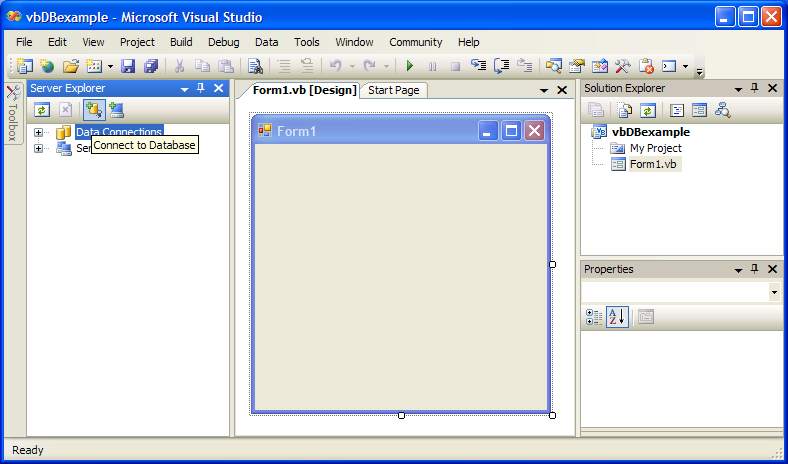
 Visual Studio Server Explorer
This panel allows you to browse servers on your network and locate databases. Click on the Connect to Database button (highlighted above). The Add Connection dialog will appear as follows
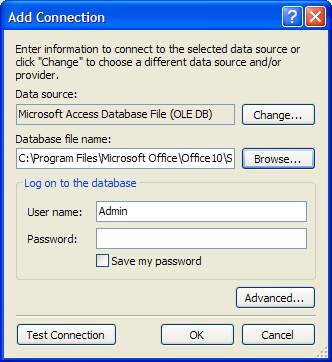
 Visual Studio Connect to Database
Change the Data source field to Microsoft Access Database if necessary. Click on the Browse button and locate the Northwind.mdb database. Once you have selected the Northwind database click on the Test Connection button to verify the database is accessible. Assuming the connection is successful, click on the OK button to apply the connection.
The database is now connected to the application and it is time to select a data source.

Selecting the Data Source

Once the database connection is established, the next step is to select the data source to be used in the application. To achieve this, select the Data->Add New Data Source menu option. The Data Source Configuration Wizard will appear as follows:
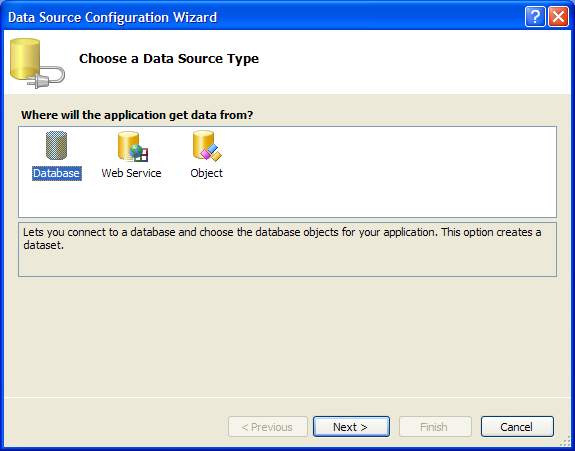
 Visual Studio Select Data Source
Since we are selecting data from a database, make sure that Database is highlighted in this dialog and click Next. Ensure that the Northwind database is listed in the following screen and pressNext to proceed.
A dialog will appear asking if you wish to move the database file to your project area. Click Yes. Finally the wizard will display the connection string (this the name used to refer to the database in your code. Accept the default suggestion and click Next. Finally, you will be asked to select the data objects you wish to access from your application. For the purposes of this example click theTables option and press Finish.

Adding a DataGridView Control

Now that we have our data sources configured the next step is to add a DataGridView control to our application. Access the Toolbox and drag and drop the DataGridView control onto the form. Resize the control so that fills the entire form and set the Anchor property in the Properties panel so that all sides are anchored (such that when the form is resized the DataGridView will also resize).
If the Data Sources panel is not visible, select the Data->Show Data Sources menu option. Once visible, click and drag the Customers table from the Data Sources panel over the DataGridView control on the form. The form will update to display columns and rows. Press F5 to build and run the application:
Image:vb_datagridview_running.jpg

Saving Changes to a DataGridView

It is important to realize that when changes are made in a DataGridView control the changes are only made to the DataSet and are not written back to the database. In order for the data changes to be stored back to the database an additional step is needed.
Extend the above example to add a Button control. Once the Button has been added, double click on it to view the code for the Click code procedure and edit the code so that it appears as follows:
Private Sub Button1_Click(ByVal sender As System.Object, ByVal e As System.EventArgs) 
        Handles Button1.Click

        Me.CustomersTableAdapter.Update(Me.NorthwindDataSet)

        Me.NorthwindDataSet.AcceptChanges()

End Sub

Customizing the DataGridView Control

Various aspects of the DataGridView control can be configured using Visual Studio, such as the columns displayed.
To edit the columns displayed in the grid, right click with the mouse over the control in the form designer and select Edit Columns.... The following dialog will appear. Use the Add... and Removebuttons to configure the columns displayed by the grid:
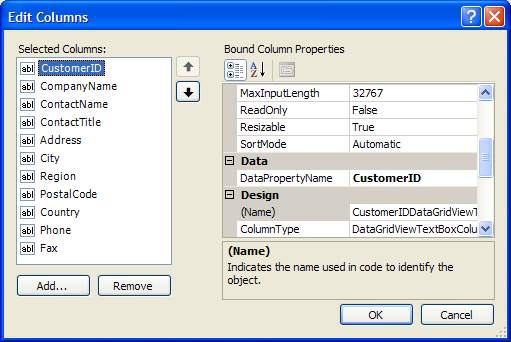
 Edit DataGridView Columns

ADONET VB 1

Connected to a Database

Begin by launching Visual Studio and creating a new Windows Application project called "VBdatabase". Once the new project has been created the first task is to connect to the Northwind database. Click on the View menu and select Server Explorer. The Server Explorer panel will appear on the left hand side of the main Visual Studio area:
 Visual Studio Server Explorer
This panel allows you to browse servers on your network and locate databases. Click on the Connect to Database button (highlighted above). The Add Connection dialog will appear as follows:

 Visual Studio Connect to Database
Change the Data source field to Microsoft Access Database if necessary. Click on the Browse button and locate the Northwind.mdb database. Once you have selected the Northwind database click on the Test Connection button to verify the database is accessible. Assuming the connection is successful, click on the OK button to apply the connection.
The database is now connected to the application and it is time to select a data source.

Selecting the Data Source

Once the database connection is established, the next step is to select the data source to be used in the application. To achieve this, select the Data->Add New Data Source menu option. The Data Source Configuration Wizard will appear as follows:
 Visual Studio Select Data Source
Since we are selecting data from a database, make sure that Database is highlighted in this dialog and click Next. Ensure that the Northwind database is listed in the following screen and pressNext to proceed.
A dialog will appear asking if you wish to move the database file to your project area. Click Yes. Finally the wizard will display the connection string (this the name used to refer to the database in your code). Accept the default suggestion and click Next. Finally, you will be asked to select the data objects you wish to access from your application. For the purposes of this example click theTables option and press Finish.

Linking Data Sources to an Application

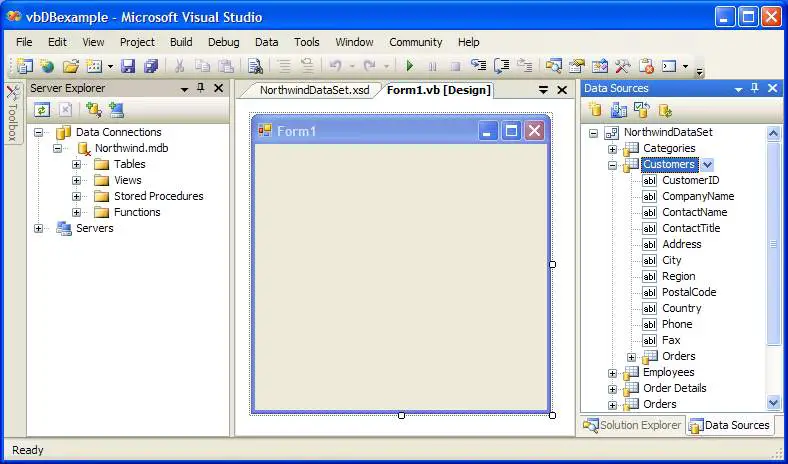
The next step in our tutorial is to add some data fields to our application form. The first task is to display the Data Sources Panel by selecting the Data->Show Data Sources menu option. The data source panel will subsequently appear listing all the data tables and columns that are available to us. Click on the '+' sign next to the Customer table to unfold the list of customer fields:
 Visual Studio Data Sources Panel
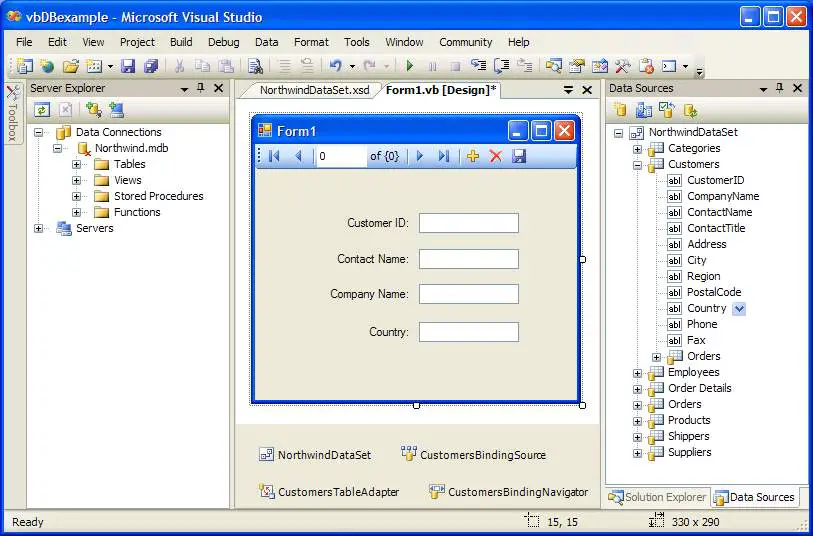
We are now ready to add some data columns to our form. Drag and drop the CustomerIDCompanyNameAddress and Country fields onto the form so that they appear as follows:
 Visual Basic Database Example
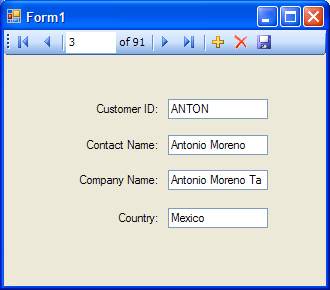
Once the data fields are added you will notice that Visual Basic adds a toolbar to the top of the form to provide navigation and the ability to add and remove records from the database. Press F5 to build and run the application. When the application starts the fields will be populated with data from the database. Use the toolbar to move through the records:
 Visual Basic Database Example
You have created your first database driven Visual Basic application.

Adding SQL Statements to a Visual Basic Application

The next step in our example is to add an SQL Query to our application. Click on the Company Name TextBox in the form and select the Data->Add Query menu option. In the Search Criteria Builderdialog change the New Query Name to France and click on the Query Builder button.
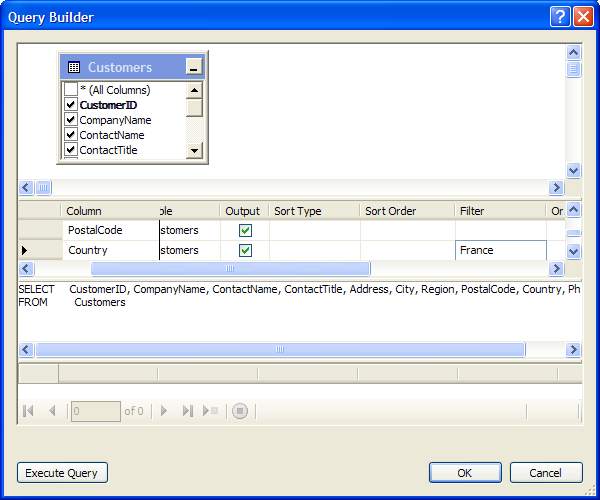
In the Query Builder dialog, scroll down the table until you reach the Country column. Scroll horizontally until you reach the Filter field and enter France as the filter criteria:
 Visual Studio Query Builder
Click on OK. Visual Studio will generate the appropriate SQL statement to perform this query.
SELECT     CustomerID, CompanyName, ContactName, ContactTitle, Address, City, 
Region, PostalCode, Country, Phone, Fax FROM Customers WHERE (Country = 'France')
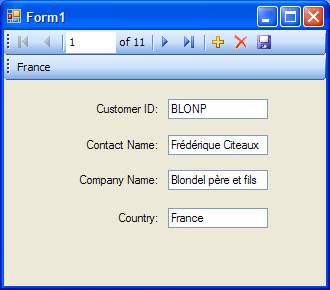
Press F5 to rebuild and run the application. An additional toolbar now appears labeled France which, when pressed, filters the database entries so that only customers in France are selected:
Image:vb_database_filter.jpg

String Function

String functions:

There are many useful string functions in Visual Basic 6. The string functions are defined in the "Strings" module. Search in the object browser.
The string functions are explained below:


Left:
The Left function extracts characters from the left of the string.
Syntax:
Left(string, n) 
n is the number of characters to be extracted.
Example:
Print Left("Visual", 3)
Output:
Vis
Right:
The Right function extracts characters from the right of the string.
Syntax:
Right(string, n)
String is the character string, n is the number of characters to be extracted.
Example:
Print Right("Visual", 3)
Output:
ual

Mid:
Use the the Mid function to extract characters from the middle of the string.
Syntax:
Mid(string, m, n)
String is the character string, the extracted string will begin at mth character, n is the number of characters to be extracted.
Example:          
Print Mid("Visual", 3, 2)
Output:
su

Len:
The Len function calculates the number of characters in a string.
Example:
Private Sub cmdCount_Click()
Dim str As String
str = "Visual Basic"
Print Len(str)
End Sub

Output:
12
InStr:
The InStr function returns the position of first occurrence of a sub-string contained in a string.
Syntax:
Instr(str1, str2)
Example:
Dim str As String
str = "Visual Basic"
Print InStr(str, "Basic")
Output:
 8
Chr & Asc:
 The Chr function converts an ASCII value to character and Asc function converts the character to ASCII.
 Syntax:
Chr(ASCII value)
Asc(chr)
Example:
Print Chr(65)
Output:
A

Example:
Print Asc("A")
Output:
65
Chr(9) and chr(13) are the Tab and Carriage-return characters respectively.
Example:
Print "Hello" & Chr(9) & "world"

Output:
Hello        world

Print "Hello" & Chr(13) & "world"
Output:
Hello
world
Str:
The Str function returns the string representation of a number.
Syntax:
Str(n)
Example:       
Print str(5) + str(7)
Output: 57

LCase & UCase:
The LCase function converts an upper case string to lower case and the UCase converts a lower case string to upper case.
Example:
Private Sub cmdChangeCase_Click()
Dim s As String
s = "HELLO"
Print LCase(s)
End Sub
Output:
hello
Example:
Dim s As String
s = "hello"
Print UCase(s)

Output:

HELLO

Trim:
The Trim function returns a string without leading and trailing spaces.
Example:
Dim s As String
s = "                      HELLO"
Print Trim(s)

Output:

HELLO
LTrim & RTrim:
The Ltrim function trims leading spaces and the RTrim function trims trailing spaces from a string.
StrReverse:
The StrReverse function reverses a string.
Example:
Print StrReverse("Basic")
Output:
cisaB

Space:
Space function returns a specific number of spaces.
Example:
Print Space(10) + StrReverse("Basic")
Output:
           Basic
10 spaces before Basic
StrConv:
The StrConv function converts the string into a particular case, e.g upper case, lower case and proper case.
Example:
Print StrConv("hello", vbUpperCase)
Output:
 HELLO

Print StrConv("hello", vbProperCase)
Output:
Hello

StrComp:
The StrComp function compares two strings to check whether they match or not. It returns 0, if the two strings match with one another.
str = StrComp("vb", "vb", vbTextCompare) 'Returns 0
str = StrComp("vb", "VB", vbTextCompare) 'Returns 0
str = StrComp("vb", "VB", vbBinaryCompare) 'Returns 1
If the optional argument is vbTextCompare then this is a case insensitive comparison, if vbBinaryCompare then it's a case sensitive comparison.

Tab:
The Tab(n) function lets the string be displayed at nth position.
Example:
Print Tab(20) ; "Language"
Output:

                    Language

Intro and Basic Syntax

Introduction

Visual Basic is a highly popular language in the commercial world because it allows for the rapid development of Windows based programs. VB is particularly strong at creating front ends for databases. This can be done in amazing time through the use of wizards. This page does not cover all aspects of VB, it does not show how to do the basics like layout a form, neither does it cover all the built in functions, as there is already plenty of help provided for these, and a lot of it is self-evident.
A more limited version of Visual Basic is also included in several other Microsoft Applications such as MS Access. Most of the information here applies to that version.

Data Types:

1. Numeric
ByteStore integer values in the range of 0 - 255
IntegerStore integer values in the range of (-32,768) - (+ 32,767)
LongStore integer values in the range of (- 2,147,483,468) - (+ 2,147,483,468)
SingleStore floating point value in the range of (-3.4x10-38) - (+ 3.4x1038)
DoubleStore large floating value which exceeding the single data type value
Currencystore monetary values. It supports 4 digits to the right of decimal point and 15 digits to the left

2. String
Use to store alphanumeric values. A variable length string can store approximately 4 billion characters

3. Date
Use to store date and time values. A variable declared as date type can store both date and time values and it can store date values 01/01/0100 up to 12/31/9999

4. Boolean
Boolean data types hold either a true or false value. These are not stored as numeric values and cannot be used as such. Values are internally stored as -1 (True) and 0 (False) and any non-zero value is considered as true.


Operators in Visual Basic:

Arithmetical Operators

Operators
Description
Example
Result
+
Add5+510
-
Substract10-55
/
Divide25/55
\
Integer Division20\36
*
Multiply5*420
^
Exponent (power of)3^327
Mod
Remainder of division20 Mod 62
&
String concatenation"An"&" "&"Apple""An Apple"

Relational Operators

Operators
Description
Example
Result
>
Greater than10>8True
<
Less than10<8False
>=
Greater than or equal to20>=10True
<=
Less than or equal to10<=20True
<>
Not Equal to5<>4True
=
Equal to5=7False

Logical Operators
Operators
Description
OR
Operation will be true if either of the operands is true
AND
Operation will be true only if both the operands are true

Array Functions:
Arrays in Visual Basic are very useful things to store a collection of variables or store records. Visual Basic allows any variable type to become an array.

Array([item], [nthitem])
Turns a list of arguments into an array

Example:
Dim a() as String
a() = Array("5","10","15","20")
MsgBox("My Number Is: " & a(3))
' A message box will popup with the text "My Number Is: 20"

IsArray([expr])
Returns a Boolean value that indicates if a specified variable is an array.

Example:
' Create a 3 element array
Dim a(3) as String
a(0) = "Blue"
a(1) = "Green"
a(2) = "Yellow"
IsArray(a)
' True
' Declare a single variable
Dim b as String
b = "Orange"
IsArray(b)
' False

Join(array, [delimiter])
Joins the array elements using the specified delimiter character(s)

Example:
' Declare variables.
Dim days() as String
Dim a as String
days() = Array("Sun","Mon","Tue","Wed","Thu","Fri","Sat")
' The default delimiter for Join() is a space " ".
a = Join(days())
' a="Sun Mon Tue Wed Thu Fri Sat"
a = Join(days(), ",")
' a="Sun,Mon,Tue,Wed,Thu,Fri,Sat"
a = Join(days(), "##")
' a="Sun##Mon##Tue##Wed##Thu##Fri##Sat"

Split(string, [delimiter], [count], [compare])
Split a string into an array that contains the specified number of substrings. When count is ommited, splits into as many substrings as possible.

Example:
' Declare variables.
Dim days() as String
Dim a as String
a="Sun,Mon,Tue,Wed,Thu,Fri,Sat"
days() = Split(a, ",")
MsgBox(days(3))
' Wed

LBound(array)
UBound(array)
Returns the smallest subscript (or largest for UBound) for the specified array

These functions are very useful when you don't know the size of an array.

Example:
Dim days() as String
Dim a as String
days() = Array("Sun","Mon","Tue","Wed","Thu","Fri","Sat")
a = LBound(days())
' a=0
a = UBound(days())
' a=6 

Mathematical Operators:

Example1:

Dim a As Double, b As Double, c As Double
    a = 12: b = 5
    c = a \ b
msgbox(c)    
Print c
End Sub


Output:
2

Example2:

Dim a as Integer
Dim b as Integer
Dim c as Integer
a=1
b= 2
c = a + b
msgbox(c)
End Sub

Output:
3

IF and IF Else Condition:

Example1:

Dim num1 As Integer
num1 = 30
If num1 > 0 Then
msgbox("The number is positive")
End If

Output:
The number is positive.

Example2:
To print the largest number.
Dim num1 As Integer, num2 As Integer
num1 = 30
num2 = 50
If num1 > num2 Then
msgbox( num1)
Else
msgbox( num2)
End If

Output:
50

Nested IF Else:

Example:
a = Val(InputBox("Enter a no."))
If a > 0 Then
Print "Positive"
ElseIf a < 0 Then
Print "Negative"
Else
Print "Zero"
End If


Input and Output Operation:

Example: (TextBox)

Private Sub Command1_Click()
Dim a As Integer
a = Val(Text1.Text)
a = a + 1
Text2.Text = a
End Sub

Example: (Input Box)

Private Sub cmdTakeInput_Click()
Dim n As Integer
n = InputBox("Enter the value of n : ")
Print n
End Sub

Switch Statement:

Example:
Dim num As Integer
num = Val(Text1.Text)
Select Case num
Case 0
Print "You have entered zero"
Case 1
Print "You have entered one"
Case 2
Print "You have entered two"
Case Else
Print "The number you entered is greater than 2"
End Select

Do While Loop:

Example:
To print from 0 to 9.
Dim num As Integer
num = 0
Do While num < 10
Print num
num = num + 1
Loop

Do Loop While:

Example:
To print from 0 to 10.
Dim num As Integer
num = 0
Do
Print num
num = num + 1
Loop While num <= 10

Do Loop Until:

Example:
'x is incremented until x becomes greater than 10
Dim x As Integer
x = 0
Do
x = x + 1
Loop Until x > 10
MsgBox x

For Next Loop:

Example:
Dim i As Integer
For i = 0 To 10
Print i
Next i


Output:
To print 0 to 10.

Example2:
Dim i As Integer
For i = 0 To 6 Step 2
Print i
Next i

Every time, the value of i is incremented by 2.

Output:
0
2
4